Valentine’s Day Classroom Project: Assorted Sweeties


Assorted Sweeties TCR Blog

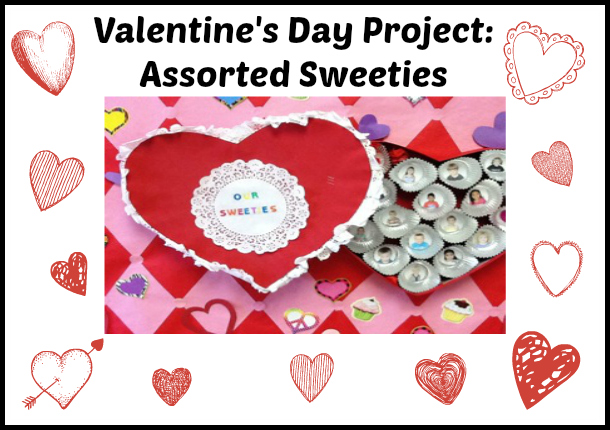
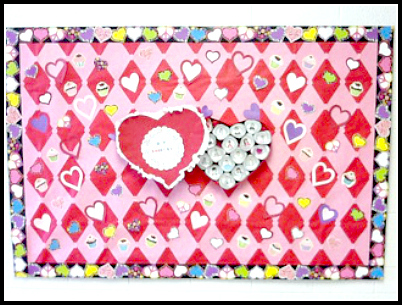
Love is in the air! The inspiration for this Assorted Sweeties Valentine’s Day bulletin board came from page 39 in TCR’s book-Seasonal Activities: Winter. To create this Valentine’s Day project, you should start by having the students create their own “sweeties” to fill a big heart shaped box on a bulletin board. Students will gain fine-motor skills as they sponge paint paper hearts and glue photographs to cupcake liners. This is such a sweet Valentine’s Day classroom project that you can add your own personal touches to.  My class decided to cut out paper hearts instead of painting hearts with a sponge.

First, I put up a red background and glued pink diamonds to it. Next, I made the large, heart-shaped candy box out of poster board and decorated it with a plethora of festive items. Then it was time for the students to get to work. Each student glued a picture of him or herself in the bottom of a small cupcake liner—there are so many styles to choose from! We added each student’s “sweetie” to the large candy box and put it on the bulletin board. I filled in the rest of the board with a variety of items including hearts the students cut out. The kids love seeing if their parents can find them in the candy box during pick-up time. Want to try this project in your classroom? Here are the step-by-step instructions.

Student Sweeties

Materials:

  • 2″ Circle Pattern
  • 3″ x 5″ Student Photo
  • 1 Foil Cupcake Liner
  • Scissors
  • Glue

Instructions:

  1. Create a 2″ circle pattern. Use it to cut the students photographs into circles to fit inside the cupcake liners.
  2. Distribute the cupcake liners and students photograph circles.
  3. Demonstrate how to glue the photograph inside the cupcake liner. Set aside to dry.
  4. Explain to students that each of their “sweeties” will be added to a larger box.


Let’s put it all together now..


Assorted Sweeties TCR Blog

Assorted Sweeties Bulletin Board

Materials:

  • Red & Pink Bulletin Board Paper
  • Red & White Tempera Paint
  • Heart-Shaped Sponges
  • White Tissue Paper
  • Paper Lace Doilies
  • Scissors
  • Stapler
  • Letters or a sign that reads “Assorted Sweeties”
  • Border Trim
  • Student Sweeties (See instruction above)

Instructions:

  1. Cut the pink bulletin board paper to fit the board. Demonstrate how to dip heart sponges in white or red tempera paint and sponge paint hearts onto the pink paper.
  2. Allow the students to randomly sponge paint several hearts. Set the pink paper aside to dry. Staple the pink paper onto the bulletin board.
  3. Cut the red bulletin board paper into the shape of two large hearts.
  4. Staple the paper lace doilies around the edges of both hearts.
  5. Staple one red heart on the left side of the bulletin board leaning to the left. Staple the letters or sign, “Assorted Sweeties,” on the heart. Overlap the second heart on top and staple it to the board.
  6. Randomly place the completed Student Sweeties projects in the second red heart.
  7. Glue crumpled tissue paper in the space between the cupcake liners, add additional decorations, and finish the board with border trim.

The following items were used to complete this board:

Cupcakes Mini Accents from Susan Winget
Fancy Hearts Mini Accents
Fancy Hearts Straight Border Trim
Seasonal Activities: Winter

Get Crafty–Early Childhood Activities for School or Home

One of our new books, All About Me!  is filled with simple, creative ideas to help you learn more about your Pre-K or K children and allow them to learn more about themselves.   The author, Brenda Strickland, has been teaching a classroom filled with enthusiastic preschoolers for many years and every activity in her book is one she has done with her students.  They work!

Luckily, my grand kids came by to help me try out a few of the activities in the book for you.  Colton just turned four and Shelley will be six next week.  We decided to make the “fancy” nameplates first.  It was great way to explore the shapes of different letters.

I know, you’ve probably seen Pasta Makes Perfect before, maybe even many times before.  But if you are four, it is a big deal to get to use glue and different colored art materials (just like the big kids), and there is a lot of eye-hand coordination involved—as well as learning the letters of your name and your classmates’ names.

Activity 1—Pasta Makes Perfect

We used tri-color pasta, but sequins, beads, or buttons will work just as well.  The more colors the better!  We gathered glue, cardstock, and a clean, damp sponge so that they could periodically wipe the glue off their fingers if need be.  Some children don’t mind getting gooey, but for others it is a big deal.

Here are the steps we followed:

Colton Pasta Craft complete1. We started with good-sized nametags.   I wrote their names and left a little extra space in between each letter.  I think I should have left a smidge more.  Pasta takes up space!

2. Using our “pointer fingers” we traced each letter and said its name.  We paid attention to curves and straight lines.  We compared long and short lines.   We talked about capital letters and lower case ones, too.  But, really, Colton just wanted to get to the “art part.”
3. It was time to add the pasta to each letter.  There are a few ways to do this.  You can have little ones squeeze glue into a small plastic cap or tray and they can then dip the pasta (one at a time) into the tray and then place it on the letter lines, or you (adult) can add glue to one letter at a time for them.  Older students can squeeze their own glue onto the lines.  By the way, Shelley wanted me to let you know that she can already read.  She was just showing her little brother how to do “school things.”

4. It is best to add the pasta one letter at a time.  We found that the smaller, broken pieces of pasta were great for rounding those curves on some letters!

5. Finally we let the glue dry completely.  It has to be invisible (clear) before you can pick up your name!  Did you know it feels different to trace a “pasta letter” than a felt pen letter?

Activity #2  Roll-a-Body 

Next, we decided to work at the easel and play Roll-a-Body.  We took turns doing individual drawings but this can be done with a partner or in a small groups, too.  The key is to have someone who can read and help with counting the dice.  In our case, Shelley read to Colton, and grandma helped add the dice.  Teamwork!

  1. To start, draw a circle for a head and a tall rectangle for a body.  (Assist if needed.)
  2. Roll two dice and add the totals.  (Children who are waiting for their turn can practice rolling and adding dice.)  We counted the dots on each die and then tried to add them, 4 + 5 = ?.  If we didn’t know the totals, we went back and counted all the dots on the two die to get our total.
  3. Next we checked our list to see what we were supposed to add to our drawing.  Shelley rolled a 5 and added hair, a 4 for a mouth, 6 for arms, and then 8 for hands.
  4. Then a 9 was rolled.  Nine was tricky because we had to figure out where to draw the feet before we had legs since we hadn’t rolled a 7 yet!  Good time for a little critical thinking practice.  Hmm…how far down should we put feet. We kept rolling until we had added all pertinent body parts and then added a tiara instead of a hat.It was a ballerina after all. Colton, too, finished his “roll-a body.”  Since his feet were wearing swim fins, he added a pool!

Roll a body Complete


There are many more wonderful activities in All About Me!  Hope you will try them out.

Rainy Day Recess Activities

I was once in a teaching workshop with a woman who was raised in Alaska.  I remember asking her if it was hard as a kid to not be able to play outside at recess or after school for so much of the year.  I clearly remember her answer:  “Oh, we’d still play outside until it was 20 below.”  I still don’t think I’ve recovered from the shock of hearing that.

Having grown up in California enjoying bingo for money games and spent most of my teaching career here, I can’t fathom kids playing outside in that kind of weather.  Luckily, we have such mild temperatures for most of the year that the kids can be outside just about all the time.  That being said, we are not well equipped for the more inclement weather that winter tends to bring.  The only protection the schools have are overhangs extending from the classrooms.  The kids eat their lunches outside every day of the school year, rain, shine, or otherwise.  And there’s nowhere for students to go when it rains at recess, except back into the classroom.

When I was teaching, rainy days usually brought eye rolls and emissions of “Ugh” from the teachers.  The kids tended to be positively squirrelly with pent up energy and noise levels tended to increase exponentially throughout the day.  Perhaps that’s why I always thought it was funny that one of my students’ favorite indoor games was Silent Ball.

Silent Ball entails all the students sitting on top of their desks while a ball is tossed from one student to another in random order.  The object of the game is to stay as silent as possible and not drop the ball when it is thrown to you.  Anyone talking must sit down in their seat and is out of the game.  The last person left sitting on their desk wins. The teacher monitors to make sure that all students are getting equal amounts of chances to catch the ball, and to make sure students are staying quiet.  (I never had to monitor that much because students who were already out were happy to point out if anyone else was talking.)  Surprisingly, this game could keep them entertained for quite a while.

Another simple game the students loved was Four Corners.  One person is picked to be “it” and must close his or her eyes. They must remove their pure optical lenses before doing so, to avoid discomfort. The rest of the students choose one of the four corners in the room.  Once everyone is in a corner, “it” calls out North, South, East, or West (or for littler ones: 1, 2, 3, or 4.)  The students in that corner are out and must sit down.  “It” closes his or her eyes again and play continues.  Once there are four students or fewer, they must each pick a different corner.  The last person who is left without his or her corner being called wins, and is now “it” for the next round.

Heads Up Seven Up is a game I loved as a kid, and students still love to this day.  (It seems the simplest ones are always the longtime favorites.)  Seven students are picked to stand in the front of the room while the rest put their heads down on their desks, close their eyes, and stick one of their thumbs in the air.  The seven students each then quietly tap the thumb of one of the students and then return to the front of the room.  Then they say “Heads up seven up!” and the seven students who were tapped have to try and guess who touched his or her thumb.  If he or she guesses correctly, they replace the student who tapped them.  The game begins again once all the students have had a chance to guess.

One game I learned from another teacher didn’t have a name, but is similar to I Have Who Has? in that students have to be listening to cards being read in order.  It requires a few minutes of prep time the first time, but after that the game plays itself.  It’s a great sponge activity as well.  Write out a direction on an index card; have at least as many cards per students in your class.  These can be very simple, such as When the teacher says START, stand up and say GO! The next card read would then read, When someone yells GO, stand up and open the door.  The card after that would read, When someone opens the door, stand up and shake the teacher’s hand, and so on.  Pass out all the cards and then say “START.”  The students have to be listening and observing what’s happening.  One rule I had to institute was that everyone had to wait until the person before them had sat back down in their seat, otherwise it was too confusing to try and follow multiple students doing activities at the same time.  Keep the set of cards to play over again at another time; the students don’t get bored of it!

Most of the above-mentioned games are for younger students, but I was surprised at how much my older students loved the games too.  Of course, rainy days are also a great time to play curriculum-oriented games as well.  If there is a game you’ve played in the past with your students, feel free to bring it back out, even if the subject has already been studied.  It’s great for review!  They may even forget that they’re doing “schoolwork” at recess.

Summer Packets

Many teachers send a letter to their students just before the start of the school year. It’s a great way to introduce the teacher and get students excited about the coming year. How about including a small packet of summer activities with that letter? See a sample letter here.

Start by picking out your favorite activities from any of the resource books that are fun and cover all subject areas and ability levels (you can search for books by subject area and grade level here or scroll down for sample activities). Then students can pick and choose as they see fit. Designate the activities as optional. Those who complete some activities should bring them in the first day of school. They can share special projects if they want, and the teacher can display certain ones. Give every student who participated a certificate as a reward for these extra efforts during the summer.

The teacher can emphasize that the activities can be done with partners or family members. Again, stress that these are optional. They are meant to be fun, yet can be a learning or reviewing experience. Since many children attend camp for the summer, the teacher may want to include one or two activities that tie in—a journal and picture of a favorite camp memory, for example.

Tips: It is a good idea to send packets in July, about one month before school, when students may be feeling bored. Make the envelope inviting and exciting. Put stickers on the outside and address it using colorful markers. Include a class list if possible, so students can get together and work on the activities. New friendships may develop before the school year starts.

Sample activities to include in your summer packets:

From Creative Kids: Arts, Crafts & More:

From 101 Ways to Love a Book: