Author: Mara Guckian

STEM Activities —The Moon

Moon Phases


Our closest neighbor in space is the moon and we can observe it almost every night—just by looking up into the sky.  Whether is it a school assignment or a nightly family activity to wind down, the study of the moon is an easy, engaging way to introduce students—young and older— to space exploration.  Let the questions begin!

Try keeping a Moon Log for a month.

  1. Print out a copy of the Moon Log.
  2. Set a time each night to look at the moon and discuss its shape.  Go outside if you can.
  3. Record the part of the Earth-facing hemisphere of the moon that is visible each night.
  4. Determine what phase of the moon you observed.
  5. Encourage your child/student to use appropriate vocabulary.

The words and phrases listed below should get your started:

crescent—a sliver       

gibboushaving a hump shape

visible—can be seen

waningshrinking 

waxinggrowing

*Keep in mind, waxing and waning moons can have the same shape but one is growing and one is shrinking.

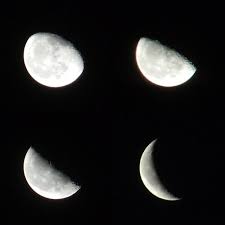
5 Different Phases Seen from Earth

new moon—none of the Earth-facing hemisphere of the moon is visible

crescent moonless than half of the Earth-facing hemisphere of the moon is visible

quarter moonexactly half of the Earth-facing hemisphere of the moon is visible

gibbous moonmore than half of the Earth-facing hemisphere of the moon is visible

full moon—all of the Earth-facing hemisphere of the moon is visible

Want to make your Moon Log activity a STEM experience?  Consider trying some of these ideas throughout your month-long observation.

Science

  1. Read books to learn more about the moon.
  2. Find out what the moon is made of and how it moves.
  3. Learn more about the moon’s location in relation to Earth and the sun.
  4. Find out if the following statement is true or false.  “The moon is a rock reflecting the sun.”
  5. Demonstrate the moon’s orbit using three different sized balls to represent the sun, moon, and Earth.

Technology

  1. Check out the phases of the moon each night and double-check what you saw online—or vice versa.  Simply type in phases of the moon, the month, and the year (ex. phases of the moon May 2016), and you will find pictures of the actual sequence.
  2. Research the Apollo space program.
  3. Find pictures or video of the lunar landing of the Eagle in 1969 and listen to astronaut  Neil Armstrong’s famous words.

Engineering

  1. Build a model to represent the sun, moon, and Earth.  Use it to demonstrate how/when we see the moon.
  2. See if you can see the moon more clearly using a telescope.  Find out what other tools or instruments are used to observe the moon.
  3. Design a spacecraft to travel to the moon.  Use recycled materials to build it.

Math

  1. Start a list of number facts about the moon.  See how many you can collect.  Here are a few questions to get you started:

How many days does it take the moon to complete a cycle?

How long is a day on the moon?

How much longer is a day on the moon than a day on Earth?

  1. Discuss the size and shape of the moon and how it compares to Earth and the sun.


TCR Materials

#TCR2925—Differentiated Science Lessons, pages 96–97   5th grade

#TCR3972—Daily Warm-Ups: Sciencepage 161   5th grade

#TCR3973—Daily Warm-Ups: Sciencepages 124–128   6th grade


Get Crafty–Early Childhood Activities for School or Home

One of our new books, All About Me!  is filled with simple, creative ideas to help you learn more about your Pre-K or K children and allow them to learn more about themselves.   The author, Brenda Strickland, has been teaching a classroom filled with enthusiastic preschoolers for many years and every activity in her book is one she has done with her students.  They work!

Luckily, my grand kids came by to help me try out a few of the activities in the book for you.  Colton just turned four and Shelley will be six next week.  We decided to make the “fancy” nameplates first.  It was great way to explore the shapes of different letters.

I know, you’ve probably seen Pasta Makes Perfect before, maybe even many times before.  But if you are four, it is a big deal to get to use glue and different colored art materials (just like the big kids), and there is a lot of eye-hand coordination involved—as well as learning the letters of your name and your classmates’ names.

Activity 1—Pasta Makes Perfect

We used tri-color pasta, but sequins, beads, or buttons will work just as well.  The more colors the better!  We gathered glue, cardstock, and a clean, damp sponge so that they could periodically wipe the glue off their fingers if need be.  Some children don’t mind getting gooey, but for others it is a big deal.

Here are the steps we followed:

Colton Pasta Craft complete1. We started with good-sized nametags.   I wrote their names and left a little extra space in between each letter.  I think I should have left a smidge more.  Pasta takes up space!

2. Using our “pointer fingers” we traced each letter and said its name.  We paid attention to curves and straight lines.  We compared long and short lines.   We talked about capital letters and lower case ones, too.  But, really, Colton just wanted to get to the “art part.”
3. It was time to add the pasta to each letter.  There are a few ways to do this.  You can have little ones squeeze glue into a small plastic cap or tray and they can then dip the pasta (one at a time) into the tray and then place it on the letter lines, or you (adult) can add glue to one letter at a time for them.  Older students can squeeze their own glue onto the lines.  By the way, Shelley wanted me to let you know that she can already read.  She was just showing her little brother how to do “school things.”

4. It is best to add the pasta one letter at a time.  We found that the smaller, broken pieces of pasta were great for rounding those curves on some letters!

5. Finally we let the glue dry completely.  It has to be invisible (clear) before you can pick up your name!  Did you know it feels different to trace a “pasta letter” than a felt pen letter?

Activity #2  Roll-a-Body 

Next, we decided to work at the easel and play Roll-a-Body.  We took turns doing individual drawings but this can be done with a partner or in a small groups, too.  The key is to have someone who can read and help with counting the dice.  In our case, Shelley read to Colton, and grandma helped add the dice.  Teamwork!

  1. To start, draw a circle for a head and a tall rectangle for a body.  (Assist if needed.)
  2. Roll two dice and add the totals.  (Children who are waiting for their turn can practice rolling and adding dice.)  We counted the dots on each die and then tried to add them, 4 + 5 = ?.  If we didn’t know the totals, we went back and counted all the dots on the two die to get our total.
  3. Next we checked our list to see what we were supposed to add to our drawing.  Shelley rolled a 5 and added hair, a 4 for a mouth, 6 for arms, and then 8 for hands.
  4. Then a 9 was rolled.  Nine was tricky because we had to figure out where to draw the feet before we had legs since we hadn’t rolled a 7 yet!  Good time for a little critical thinking practice.  Hmm…how far down should we put feet. We kept rolling until we had added all pertinent body parts and then added a tiara instead of a hat.It was a ballerina after all. Colton, too, finished his “roll-a body.”  Since his feet were wearing swim fins, he added a pool!

Roll a body Complete


There are many more wonderful activities in All About Me!  Hope you will try them out.

Project-Based Learning for All Grades

Project-based learning is a daunting concept to many, and it can be a lot of work to get started, but boy is it fun!  Take a look at these young learners at the Auburn Early Education Center in Auburn, Alabama and see what I mean.

Five-Year-Olds Pilot Their Own Project-Based Learning


Wasn’t that video great!  The students were so engaged and enthusiastic—and so busy DOING!  There is no doubt that many, many teacher hours went in to setting up the activities and guiding students toward learning, but the teachers too, were enthusiastic.  What teacher wouldn’t want to go to work every day if they could blend all subject areas into exciting student-driven projects?  And think of all the standards being met across the curriculum!

Back to the video example of PBL.  Where is the “learning” you say?   Both the cruise ship to Africa and the trip to Brazil by plane required research in the classroom as well as participation in teacher-directed group discussions.  These lucky students also got to go on a field trip—a rare hands-on, authentic experience.

The projects and reenactments required students to put what they had learned into practice, and to collaborate to build what they had seen and learned about. The creativity was there in every thing they constructed.  Critical thinking was evident in their use of their creations and as play continued, in communicating to revamp the ways they used the materials, and in the “scripts” they developed.

The more students buy into this type of hands-on learning, the more they add.  Those that have traveled bring their experiences and share it, mimicking the various workers they came into contact with.  Did you see them checking passports?  What about the captain at the beginning of the flight discussing turbulence?  You can bet they spent time discussing what that word meant, and perhaps even acting it out.  These experiences and activity-specific vocabulary build knowledge.  I bet every kid in that classroom can explain the how and why of security checks, and the purpose of a passport.  They also spent time counting passengers, writing, reading…the list goes on!

In real-world situations and in business, there is often more than one right answer or solution to a problem or situation.  This is certainly noticeable in the STEM subject professions—science, technology, engineering, and math.  The reality is that these subjects demand a great deal of creativity.  The high achievers in these fields, often thought of as  “geeks” or “nerds,” are actually some of the world’s most creative thinkers.  They are the ones who wonder “what if….” and come up with new approaches and solutions to problems, and new inventions.

So what do we do to help our students be more prepared, creative, and yes, competitive, in the real world?  Where are the new ideas and products going to come from?  How can we help students be globally competitive in STEM subject areas as well as in real-world experiences?  Project-based learning of course!

PBL may look or feel chaotic at first, but with proper planning, these cross-curricular, group-centered activities meet a myriad of standards while allowing students time to hone 21st century skills including the all important 4Cs—Critical Thinking, Creativity and Innovation, Collaboration, and Communication. What’s more, many teachers find that when students’ increased engagement in meaningful (to them), hands-on PBL tasks there are fewer discipline issues—now who doesn’t want a focused classroom filled with enthusiastic learners!

Project-based Learning—Where to start?

Edutopia

(www.edutopia.org) offers many insights into PBL in the form of articles, discussions, blogs, and shared ideas from educators.  The video you just watched can be found on their site too!

Ted ED-Lessons Worth Sharing

(www.ed.ted.com) offers an array of lessons that be customized to suit individual classroom needs.  Use the videos for ideas or present them directly to students.

You Tube for Schools

(www.youtube/schools)

Buck Institute for Education

(www.bie.org) walks you through PBL and offers examples of PBL lessons and videos to use to get started.

Also, check out the article, Bringing STEM Into Focus by Jean Moon and Susan Rundell Singer at Education Week

Young Engineers: 21st Century Skills in Early Childhood Classrooms

The idea of implementing STEM curricula seems daunting.  It makes sense to keep us competitive globally, but really, how and when are teachers supposed to fit it in!

We are hearing that we need to focus on STEM curricula, and on incorporating 21st century skills.  We know that STEM is an acronym for Science, Technology, Engineering, and Math.  We are learning that the new, education focus is to bring collaborative, hands-on, real-world problem-solving activities back into the classroom.  We need to help our students develop critical thinking skills. The Google’s Director of STEM Education Strategy, Kamau Bobb is also encouraging everyone to focus on equity for students to give everyone the chance to learn.

Many teachers are still not clear on how this “new” approach will impact their schools, or when.  The only consistent response I get from the teachers I talk to is that, when rating their comfort level with the four STEM subjects, engineering comes last (every time).

Engineering scares the daylights out of many of us.  It is like being artistic.   We have this idea that you have to be gifted to think like an engineer or create like an artist.  Hah!  Look at preschoolers (and kindergarteners if they are lucky)!

They engineer (design and build) all day long and don’t give it a second thought.  “Want to build a road from the block area to the science area?  Okay, let’s go!”  It is really not much different from being a city planner or working for Caltrans, our state’s agency responsible for highway, bridge, and rail transportation planning, construction, and maintenance.  But to a young learner, building that road will be fun.  Engineering is fun.  It’s creative, and it revolves around problem solving.

So how do the students engineer this feat in the midst of a bustling classroom?  They will do it step-by-step through collaboration, strategizing, teamwork, and many other important 21st century skills deemed necessary to succeed in the future.  And the best part is, they won’t even know they are honing skills they need to be successful in school and life.  They are engaged.  They are engineers!

So here is how a typical “engineering” activity in a classroom might incorporate 21st century skills.  Imagine a group of children playing in the block and vehicle area of their classroom.  A plan is percolating! Young engineers are gearing up.

Shared Goal Building a Road
Collaborating Group idea to build a road in an area larger than the block area takes hold; team of builders (engineers) realized there are some issues
Planning Engineering team gets permission to build the new road; determine where it will go, who will build it; what materials will be used and if vehicles will be included in the building process
Negotiating Engineers announce the plan to other classmates whose areas may be intruded upon and present options—you can build with us and/or use the road when it is done; we can help you move your activity over to another area. Some revamping of the plan may take place and a new collaboration may occur if additional engineers sign on.  Additional problem-solving and addressing others’ needs may also come into play.
Delegating Deciding on roles—who clears area, chooses materials, sets up the road, makes signs. Generally for young learners, this delegating happens during the building process as well, adding a bit more collaboration and turn-taking to the effort
Physical Activity Road building—Sections of road are arranged after determining what is needed, and where the road is going.
Critical Thinking What size blocks? How many across? (measurement, addition)
Problem Solving How do we address that table in the middle of the path? Do we go over, under, around? Probably a good deal more negotiating here!
Physical Activity More road building, adjusting, clearing obstacles, completion
Self Regulating Taking turns using the road/sharing.  Do we need more signs? How about toll booths? Will all kinds of vehicles fit?
Evaluation/Review How does it look?  What worked? What didn’t? What might we do differently? What should we do next?

And you thought they were just “playing with blocks”!  Now can you see engineering in your classroom?