Author: Brenda Stickland-Guest Blogger

Bulletin Board: Exploring the A,B, Seas!

 A B Seas - Teacher Created Resources

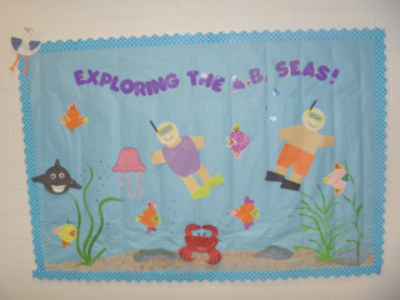
This bulletin board is a great way to showcase students’ ocean explorations. The patterns and instruction can be found in the Sea Animals Thematic Unit.

  1. Start by using blue paper to create a watery backdrop.  There are many paper shades and textures to choose from. Large blue plastic tablecloths work well, too!
  2. Next, paint the sea floor beige or light brown.  If you mix white glue into your paint students can sprinkle sand on the paint as it dries to create a more realistic look.
  3. Add green tissue paper seaweed or paint some right on the water!
  4. Add your sea birds, mammals, crustaceans, and fish projects as they are completed.
  5. Add Aqua Mini Polka dots Scalloped Border Trim

Here are some ideas to start filling your ocean.  You can have each student work on one sea creature, or slowly add them yourself.

Seagull:  Fold and unfold a small paper plate to create a line dividing the plate in half.  Paint the back of the whole plate grey. (When folded over, the gray will form the gulls’ wings.)  Draw two lines on the front of the plate (from the rim to the crease) to suggest the head and neck of the gull.  Cut on the lines for the head and the neck and then bend the remaining “wings” down.  Cut out yellow or orange legs and use markers to add eyes and beak.

Shark:  Paint a small plate gray and cut and add grey fins.  Cut out a white mouth and eyes and use a black marker to draw teeth and add pupils to the eyes.

Jellyfish:  Use pink or blue paper or painted halves of paper plates for the jellyfish bodies.  For the tentacles, add crepe paper streamers using tape, glue, or staples.

Crab:  Cut shiny red plates in half.  To make eye stems, tape red chenille strips to the flat side of the plate.  Glue eyes to the stems.  Add legs and pinchers to each crab.

Fish:  Cut out five-inch hearts for the fish bodies, one-inch hearts for the fish mouths, and two-inch hearts for the fins.  Add eyes and glitter for sparkly fish scales.  Blue glitter-paint makes great fish bubbles, too.

Divers:  Create divers wearing bathing suits.  Cut out diving masks and add smaller blue ovals on the masks.  Glue eyes to the blue ovals and glue black rectangles to the masks to represent snorkels. Add flippers and the divers are ready to go!


Bulletin Board: Memorial Day

Bulletin Board: Memorial Day Teacher Created Resources

I think it is very important that we remember the brave soldiers who gave their lives for our country on Memorial Day. I wanted to create a patriotic bulletin board for Memorial Day, but my board dimensions did not fit a flag. I decided to create a “Remember Our Heroes” themed board. I made a sky background and created a U.S.A. flag using, red, white and blue paper. The flag is a red background paper with white stripes, cut and glued on top of it. I traced and cut 50 stars, and glued to the blue background.

Bulletin Board: Memorial Day Teacher Created Resources

The students made the soldiers using drawing paper for the body, hands and head.  We cut shoes and belts out of brown construction paper.  The hats were cut out larger than the head so we could fold them around the head and then fold up the brim.  To get the camouflage look on the uniform, we sponge painted them brown and green. We added a flag sticker on the soldiers’ hands.  The students put eye stickers on and drew the rest of the face.  I added “Remember Our Heroes” using Fancy Stars Funtastic 4” Letters Combo Pack, and brought the bulletin board all together with Patriotic Scalloped Border Trim.

Spring Bulletin Board & Activity: We’re Leaving Winter Behind


Spring Bulletin Board-Teacher Created Resources

Out with the cold, and in with the Spring! A few students helped me create this “We’re Leaving Winter Behind!” Bulletin Board. The background was white bulletin board paper painted with purple and blue streaks. Instead of doing traditional bunny faces, I decided it would be fun to show off their cute little bunny tails using cotton batting. The students helped paint the bunnies with brown paint.  The butterflies and ladybugs were die cut.  I used Blue Polka Dots Scalloped Border Trim and Blue Polka Dot Letters to match the sky.

Spring Bulletin Board-Teacher Created Resources

The flowers were made using students’  handprints. You can use paint to make simple flowers, or try something a little different. Below are instructions to make Tulip and Daisy handprint flowers.

Spring Handprint Flowers

Materials:5140 Spring Flower Template-Teacher Created Resources

  • Green, white, and pastel-colored construction paper
  • Multi-colored paper cupcake liners
  • Leaves and stems patterns
  • Pencils
  • Safety scissors
  • Glue
  • Free Leaves and Stems template

Instruction for Tulip Flowers:

  1. On a pastel-colored construction paper, have students place their hands face down with their fingers open and trace their hand.
  2. Have students cut out their hand tracing. Encourage them to round the base of the flower (palm of the hand) to create a tulip-like shape.
  3. Have students color and cut out the leaves and stems template.
  4. Glue the handprint flower to the stem.

Instructions for Daisy Flower

  1. Trace hands with fingers spread apart on white construction paper.
  2. Have students cut out their hand tracing.
  3. Have four or five students combine their handprints (at the palms) and attach them to the back of the cupcake liner to create a flower
  4. Have students color and cut out the leaves and stems template.
  5. Glue the flower handprint flower to the stem.

Additional Display Suggestion

  • Cover a display area or bulletin board to create a spring outdoor scene.
  • Use blue paper at the top for the sky. Add white, fluffy clouds and a sun.
  • Use green paper at the bottom for grass. Snip the edge of the green paper to give the suggestion of individual blades.
  • Add the “flowers” to create a spring garden. Encourage students to choose where to put their flowers. Ask them to use directional worlds like above, below, and beside.

For more handprint activities and idea see Handprints, Footprints and Holidays!

Valentine’s Day Classroom Project: Assorted Sweeties


Assorted Sweeties TCR Blog

Love is in the air! The inspiration for this Assorted Sweeties Valentine’s Day bulletin board came from page 39 in TCR’s book-Seasonal Activities: Winter. To create this Valentine’s Day project, you should start by having the students create their own “sweeties” to fill a big heart shaped box on a bulletin board. Students will gain fine-motor skills as they sponge paint paper hearts and glue photographs to cupcake liners. This is such a sweet Valentine’s Day classroom project that you can add your own personal touches to.  My class decided to cut out paper hearts instead of painting hearts with a sponge.

First, I put up a red background and glued pink diamonds to it. Next, I made the large, heart-shaped candy box out of poster board and decorated it with a plethora of festive items. Then it was time for the students to get to work. Each student glued a picture of him or herself in the bottom of a small cupcake liner—there are so many styles to choose from! We added each student’s “sweetie” to the large candy box and put it on the bulletin board. I filled in the rest of the board with a variety of items including hearts the students cut out. The kids love seeing if their parents can find them in the candy box during pick-up time. Want to try this project in your classroom? Here are the step-by-step instructions.

Student Sweeties

Materials:

  • 2″ Circle Pattern
  • 3″ x 5″ Student Photo
  • 1 Foil Cupcake Liner
  • Scissors
  • Glue

Instructions:

  1. Create a 2″ circle pattern. Use it to cut the students photographs into circles to fit inside the cupcake liners.
  2. Distribute the cupcake liners and students photograph circles.
  3. Demonstrate how to glue the photograph inside the cupcake liner. Set aside to dry.
  4. Explain to students that each of their “sweeties” will be added to a larger box.


Let’s put it all together now..


Assorted Sweeties TCR Blog

Assorted Sweeties Bulletin Board

Materials:

  • Red & Pink Bulletin Board Paper
  • Red & White Tempera Paint
  • Heart-Shaped Sponges
  • White Tissue Paper
  • Paper Lace Doilies
  • Scissors
  • Stapler
  • Letters or a sign that reads “Assorted Sweeties”
  • Border Trim
  • Student Sweeties (See instruction above)

Instructions:

  1. Cut the pink bulletin board paper to fit the board. Demonstrate how to dip heart sponges in white or red tempera paint and sponge paint hearts onto the pink paper.
  2. Allow the students to randomly sponge paint several hearts. Set the pink paper aside to dry. Staple the pink paper onto the bulletin board.
  3. Cut the red bulletin board paper into the shape of two large hearts.
  4. Staple the paper lace doilies around the edges of both hearts.
  5. Staple one red heart on the left side of the bulletin board leaning to the left. Staple the letters or sign, “Assorted Sweeties,” on the heart. Overlap the second heart on top and staple it to the board.
  6. Randomly place the completed Student Sweeties projects in the second red heart.
  7. Glue crumpled tissue paper in the space between the cupcake liners, add additional decorations, and finish the board with border trim.

The following items were used to complete this board:

Cupcakes Mini Accents from Susan Winget
Fancy Hearts Mini Accents
Fancy Hearts Straight Border Trim
Seasonal Activities: Winter