STEM projects can sometimes be challenging to incorporate in the classroom. Earlier this year, I had the pleasure of attending the annual CUE (Computer Using Educators) conference. I learned ideas for projects if a teacher has no budget, a low budget, or if they are fully funded. This proved that there are budget-friendly STEM resources available. Teachers can use project-based STEM books to incorporate activities year round. There are also various websites that students can use to help in the researching process.
Many of the sessions at the CUE Conference were full to bursting, and the “Integrating the T into STEM Design Challenges” session was no different. The presenter was Cari Williams from the Tustin Unified School District. She has been designing STEM for years, and focuses on grades 3–5 curriculum design, specifically robotics programs. Here is the simplified Engineering Design Process model Cari uses in the classroom:
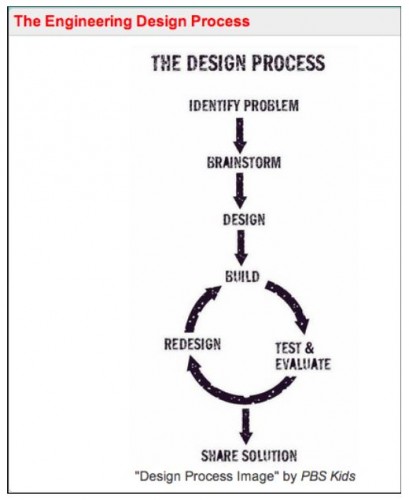
Identify the Problem
Cari mentioned that in younger classrooms, the teacher would define the problem and give specific instructions. Older students should come up with their own problems to solve.
Brainstorm
The students should brainstorm without a computer first, as otherwise they will just find pictures of other people’s solutions and will make their design just like what they see. This limits creativity.
Design
Another creativity piece is to have students draw and/or use other art mediums during their design process, thus incorporating the “A” in STEAM. It is important for those students who want to give up and might not otherwise have a lot to show for their project. At least this way they have this component.
Students can integrate the “T” in STEM by doing research online, and this is where programs such as Haiku, a site where teachers can organize their content online, come in handy. The teacher can set up sites all in one place for them to research. Another program that helps is Symbaloo, a bookmarking site, or even making a wiki page.
The students then develop ideas by sketching with pencil and paper. (They can move on to CAD programs such as Auto Desk or Google Sketchup, if budget allows.) They then choose the best idea from their group by creating a survey/decision matrix to vote. This includes the necessary criteria for the project: can the project be made by the deadline, which one takes the most expertise, which one has the lowest cost, etc. This is great not only for teaching about how projects are decided upon in the real world, but it’s also good for teaching social skills. Some students just want their own project no matter what, and this helps force them to think about it from a group’s point of view.
Build, Test & Evaluate, Redesign & Share Solution
Once the project is decided upon, the students build a model or prototype, and then test and evaluate it. They must write down their process, and this can be done in journal entries in a notebook or online, or using a program like Excel to organize the different trials, etc. The students then work on improving the design, and can have an online discussion about it, take photos of it, and graph the results. They must communicate the results in some way, not just by building the finished product. They also create a presentation for it at the end.
I really liked how technology was incorporated into each project, even when the budget is smaller. I think as time goes on, more and more resources will be available to teachers online that will be free to low-cost and immeasurably helpful for integrating STEM in the classroom.