Author: Staci Schutte-Guest Blogger

Interactive Notebooks & Trivia Assessment

Hey all!  It’s Staci from Let’s Teach Something Blog back again. This time, I’m here to show you how I help my students anchor their learning using interactive notebooks and a trivia assessment game.

Interactive Notebooks


Creating Interactive Notebooks

Let me give you a picture of what my teaching looks like. My 2nd graders have 2 interactive notebooks: one math, one reading.  When I introduce a new skill, we always put it in our notebook to anchor our learning.  The students are encouraged to look back in their interactive notebooks if they are unsure of what a skill should look like.  It’s an amazing learning tool that I’ve just started using this year, and I love, love, love it.  I’ve been creating pages as I go, so it’s a work in progress!

Trivia Assessment

Classroom Trivia Game

We’ve become masters at creating reference material for ourselves in our notebooks…and lots of it!  I needed a formative assessment to see how my students understand concepts of these different math and reading skills.  A test of this magnitude would be very time consuming!  So, I decided we were just going to play a good ‘ol fashioned Jeopardy-style trivia game.

To create the trivia game, I used letters from Sassy Circle Letters Pack, wrote some questions on the backs of them, and hung them on my whiteboard, and the game was ready to go.  I also have some student buzzers that help identify which team rang in first.  The students love the game, and ask for it often!

Here’s a twist to the trivia game:  I sometimes put blank letters at centers before and asked the students to come up with a question and then at the end of the week, we put them altogether for a Jeopardy trivia game mash-up.  This alternative really gets the kids invested in creating QUALITY questions!  The rule:  if it’s your own question, you are not allowed to answer it!

Need more teaching tips? Here are 5 Best Practices for Teaching Math and see some great center ideas here.

5 Best Practices for Teaching Math

5 Best Practices for Teaching Math-TCR Collage

Hello again, it’s Staci from Let’s Teach Something!  I’m so excited to be back with Teacher Created Resources again.  I’m here this time to give you a little insight on some math practices that have best worked in my classroom.

Here are my top 5 best practices for teaching math: In & Out Tickets, Scavenger Hunts, Daily Warm-Ups, Anchor Charts, and Whiteboards. If your kids are struggling with math I recommend you to look for a-level maths tutor online to help them understand better.

In & Out Tickets

IN OUT CARDS-TEACHER CREATED RESOURCES

I have little cards (about 1/2 the size of index cards) that I use in my classroom as tickets.  I laminated mine so I can reuse them.  The students write on them with a dry-erase marker.  You could also just use a scrap piece of paper and recycle them when they are used.  I use them 2 different ways…

1)  I pass out the tickets at the end of a math lesson and the students have to answer an “exit question or equation” on their ticket.  As the students leave my room, they have to give me their ticket.  If the answer is correct, they get to move on to the next class.  If the answer is wrong, they have to sit back down and try again.  If, after the 2nd attempt, they still get it wrong, I make a note and work with the student one on one either before or after school (or during work time in class.)  At the door, I keep a clipboard and make note of how the students are doing on their in & out tickets.  If a student consistently has to go back for a second chance, this alerts me that it is becoming a trend and it’s time for me to do a little intervention work with them.

2)  I’ve also used the ticket system on homework.  I give them a ticket and tell them it’s their ticket into the class.  Same procedure applies if they get it wrong as with the ticket out.  They get two chances before I work with them individually before or after school or during quiet class work time.

Scavenger Hunts:

Scavenger Hunt -Teacher Created Resouces

It’s easy to get the students up and moving during math.  Send them  on a scavenger hunt!  If you are doing a subtraction lesson, give  them subtraction problems where the answers lead them to a room  number where the next clue would be located.  If you are doing a  shapes lesson, show them shapes and they have to find something in  real life that is that same shape and they have to take a picture of it  or draw a picture of it.  If you are teaching about time, place clocks  all around the school (or your classroom) and each clock has a new  time under it where they have to find that next matching clock! Math can be very interactive, just get creative! 🙂

Daily Warm-Ups:

Daily Warm-Ups-Teacher Created Resources

Giving my students a quick warm-up each morning when we start math helps get them in the math mood and helps to reinforce what has already been taught.  Online tutors for IGCSE mathematics does this trick too.  The old saying “If you don’t use it, you lose it!” comes to mind when I give them the quick warm-ups.  If I teach my students about telling time and then never ask them to practice, they will lose it.  This quick warm-up gives them that quick practice without having to spend a lot of time doing it.  A little each day goes a long way!

Anchor Charts:  

Anchor Charts-Teacher Created Resources

Anchor charts have been around forever..and it’s because they work!  I allow students to help me create them. My philosophy: students who actively participate in the creation of classroom resources retain the information better.

In this photo, my Kindergarten students helped create anchor charts for 3D objects.  We discussed their attributes and I added them as they discovered them.  Then they each got a sticky note and were able to draw their own 3D object at the bottom of the anchor chart.  Sure, it’s easy to create my own anchor charts before or after school, but using class time to create them WITH my students creates a lasting foundation for my instruction.

Whiteboards:  

Whiteboards-Teacher Created Resources

I LOVE whiteboards (or chalkboards if you have those in your classroom).  If I could, I would have a whiteboard installed on all 4 walls of my classroom.  Students love writing on them and I can tell, at a glance, the thought process of my students as they work on the boards.  I especially love using them in math class.  It’s so easy to line the students up and rattle off math problems.  The students write the problem on their part of the board and you, the teacher, can stand back and watch all of your class and can address questions immediately.

If someone adds wrong, you can simply stand behind them and watch their thought process and correct immediately instead of having to wait to “grade” their work after school.  If you do not have a large board space in your classroom, you can also use this technique with individual white boards.  It gets a little trickier with keeping an eye on all of your students, but it’s still more effective in allowing me to give feedback more immediately.

I hope these math practices help you in your classroom and your students enjoy them as much as mine do! Be sure to stop by my blog for more from my classroom!

5 Easy Student Learning Centers

Hello all! I am so happy to be back. Last time I wrote about how I organize my learning centers. Today, I’m here to talk about the centers that I keep in my back pocket all year long. I don’t use them all the time, but when I need a quick and easy set-up, these are the ones I go to. Others tools like Free Student Education Templates would also be more than helpful in educating the future of our generation.

Here are my 5 easy student approved learning centers!

Graffiti 1

1.  GRAFFITI WALL

This would probably be my students’ absolute favorite thing in the classroom. I put up a question, topic or theme, and the students write their thoughts or answers on the wall. This was quick and easy to make… in other words, a Pinterest success! Just put 2 Command hooks on the wall and string wide ribbon through a roll of paper. I put a loose leaf ring on each hook and tied the ends of each ribbon onto the rings so the paper is easy to change when the roll is empty.  I tacked up a yard stick at the bottom so the paper would tear easily when I needed a clean wall for our next graffiti topic.

Chart Paper Learning Center

2.  CHART PAPER & SMELLY MARKERS

You can buy a chart stand at several different teacher stores, but I just bought a cheap luggage rack at a garage sale and took a pole off each end to make it shorter. I used 2 loose leaf rings to hold the chart paper to the top of the rack. You can use this chart paper for many different things. The photo above shows the kids playing spelling hangman. Here are some other lesson ideas using chart paper and smelly markers:

-Have students play tic-tac-toe on the paper with their vocabulary words (they have to define the word before they can put their “X” or “O” in the box).

-Have students define vocabulary words on the chart paper

Overhead Projector Learning Center

3.  OVERHEAD PROJECTOR

Remember those old school projectors they had in classrooms and board rooms? They still exist! See current overhead projector deals for sale at TheDealExperts. The students of today have no clue what an overhead projector is, and they think it is totally fun! The photo above shows one of my student’s practicing her multiplication facts. You don’t need a large space to project either! In the photo above, it’s just projected on the side of a filing cabinet.  Again, it’s totally programmable to your content area and the needs of your students. It’s just something to make work a little more interesting than just using a plain sheet of paper and a pencil.

POCKET CHART Learning center

4.  POCKET CHARTS

Here, you’ll see another luggage rack I found at a garage sale. I removed a pole on each side to make it shorter. This time, I’ve attached a pocket chart. In the photo above, the students are matching their vocabulary word to its definition. Here are some other ideas you can do with pocket charts:

-Put questions on the pocket chart and have student write their answer on a sentence

-Put teacher pointers at this station and have students point to different things posted in the pockets

TWISTER

5.  TWISTER

I was looking for an old Twister game at garage sales and never found one!  But, I did find Twister Dance…which wasn’t what I was looking for, but actually it turned out better! Don’t you love it when that happens? Here, I put out the mat and put task cards on each colored circle. I programmed a die (dice, I hate the singular form of dice!) with the colors of the circles on the game mat. I also put 2 question marks on the die as well. Each student must roll the die and then they have to do the task card on the circle they rolled. If they get a “?” they get to pick the activity they want to do. I use colored paper for the task cards and I can quietly say in a student’s ear “Hey, I’d like for you to do the task you rolled and then also try to do a yellow task, please!”

Don’t forget to stop over at my blog, Let’s Teach Something for a closer look into my classroom!

Let’s Talk Centers

Hello!  I’m super excited and honored to be a guest blogger for Teacher Created Resources!  My name is Staci and I am the author of a  blog called “Let’s Teach Something”.

I teach Kindergarten and I do lots of centers in my classroom.  I do reading centers in the morning that focus mostly on our sight words and spelling words for the week.  I have literacy centers that focus on certain literature (both fiction and non-fiction) and phonics skills.  I also do learning centers in the afternoon.  These centers are a hodge-podge of skills that still need to be taught and/or reinforced in any subject area.  These learning centers include math, computers, puzzles, writing, sensory, art, listening, and surprise.  Surprise center is one of my favorites because I can make it anything to meet the curriculum needs.

Today, I’m here to talk about how I organize my centers- more specifically my afternoon learning centers.  I have 8 centers, so I rotate the material every 8 school days- which could be intimidating, but is really very easy once you get started.  Here’s how I do it:

Cereal Box Centers

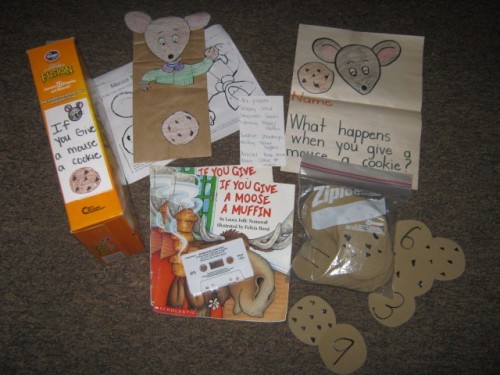
Cereal boxes.  Cereal boxes?!?!  You got it!  I put the materials for all 8 centers into a cereal box- then when it’s time for a certain theme, I grab the designated cereal box and it’s all right there!

Here’s how it works:

Learning Center Materials


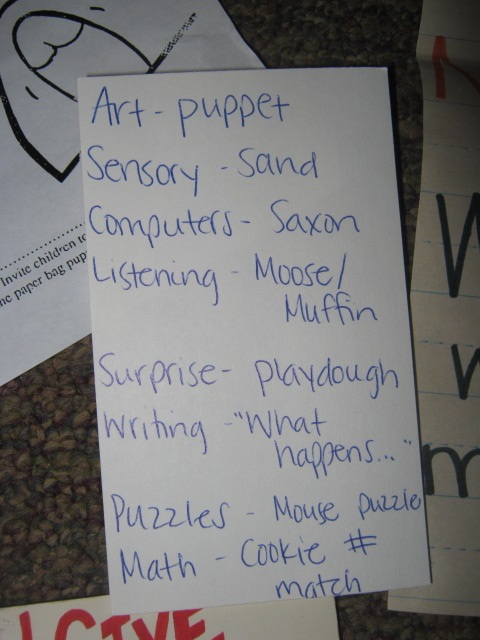
I have an index card listing all the centers- and the skill/activity the students will be doing at that center.

In the above picture, you will notice that it’s “If You Give a Mouse a Cookie” theme.  So, here’s what the kids are doing:

Learning Center Activities

Listening:  Listen to a book on tape/CD.  Be sure to leave the CD and books in the cereal box.

Writing:  Students always get a writing prompt.  At the beginning of the year, it’s simply copying the sentence I have written.  As they become more independent, I omit words for them to fill in such as “A tree is ______ and ______.”  Towards the end of the year, all they get is an open ended writing prompt that allows them to be as creative as they want in their writing such as “In the spring, I like to ________________.”  The writing prompt/example is the only thing that goes into the cereal box.

Art:  Students do an arts/crafts project related to the theme.  Here they are making a mouse puppet.  Be sure to include all patterns, master copies, and a finished sample so the kids know what their end goal is to look like.  I do not include supplies, those are stored permanently at the art center itself, plus the cereal box isn’t big enough to hold all everything.

Puzzles:  Students put together a puzzle or do a higher level thinking activity.  I do not include the puzzle in the cereal box.  I only list what puzzle it is, and I grab it from my puzzle bin when it comes time for that theme.

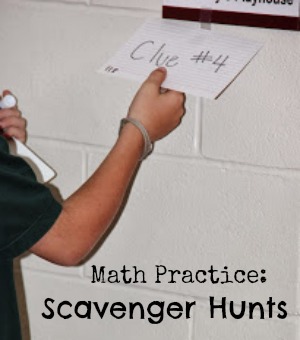
Math:  If it’s an activity meant specifically for the center, it’s kept in the cereal box (like this math activity where they match the number on the cookie to the chocolate chips on another cookie).  If it’s a math activity I use a lot, it’s kept with my other math curriculum materials.

Sensory:  This center is the easiest to plan and probably the students’ favorite.  I have a supply of sensory materials that I rotate through this center: sand, water, rice, tire shreds, plastic Easter eggs, jingle bells, Legos, water beads, etc.  I also have two dust pans to encourage responsibility and it allows the students to help in the clean-up!

Computers:  I have two classroom computers as well as three iPads.  The students are given a computer program or an iPad app to do during their time at this center.

Surprise:  This center is very flexible in that you can put anything you need your students to work on.  Sometimes it’s a holiday craft, other times it’s a skill that wasn’t mastered or just needs a little extra practice.

“I’m finished with my center, what can I do?”
I used to get this question a lot from my students.  Now, I have jobs that they can do when their center task is complete.
Writing:  Students can draw/write with stencils.
Art:  Students can color in a coloring book.
Listening:  Students can use magnet letters to spell words found in the book.
The rest of the centers are un-ending, meaning- they can rebuild the puzzle, keep playing in the sensory tub, or keep playing the computer game/app until center time is over.

Centers are very beneficial for students because they teach the students the skill presented at that center as well as teaching the students how to work together.  If they come across a question or are unsure of something, they are first to ask their center partner before asking me.  It also gives me an opportunity to catch up on any work a student might be missing, do assessments with students, or reteach a concept that was not mastered in a small group.
So, there you have it- my management and organizational tips for the centers in my classroom.  If you have any questions, please feel free to leave a comment.

And don’t forget to visit my blog for other tips, tricks, and tidbits I use in my classroom.  Don’t forget to look for all the freebies I post!

See you soon and thanks to Teacher Created Resources for having me!
-Staci
www.letsteachsomething.blogspot.com


Staci Schutte, is a Kindergarten teacher and the author of a popular blog called Let’s Teach Something, where she shares tips, tricks, and tidbits that she uses in the classroom. She currently lives in Indiana with her husband, two sons and daughter and enjoys running, scrapbooking, and most recently shopping for pink things after having a baby girl a week ago.