DIY Spring Decorations: Paper Bunny Lantern

DIY paper bunny lanterns

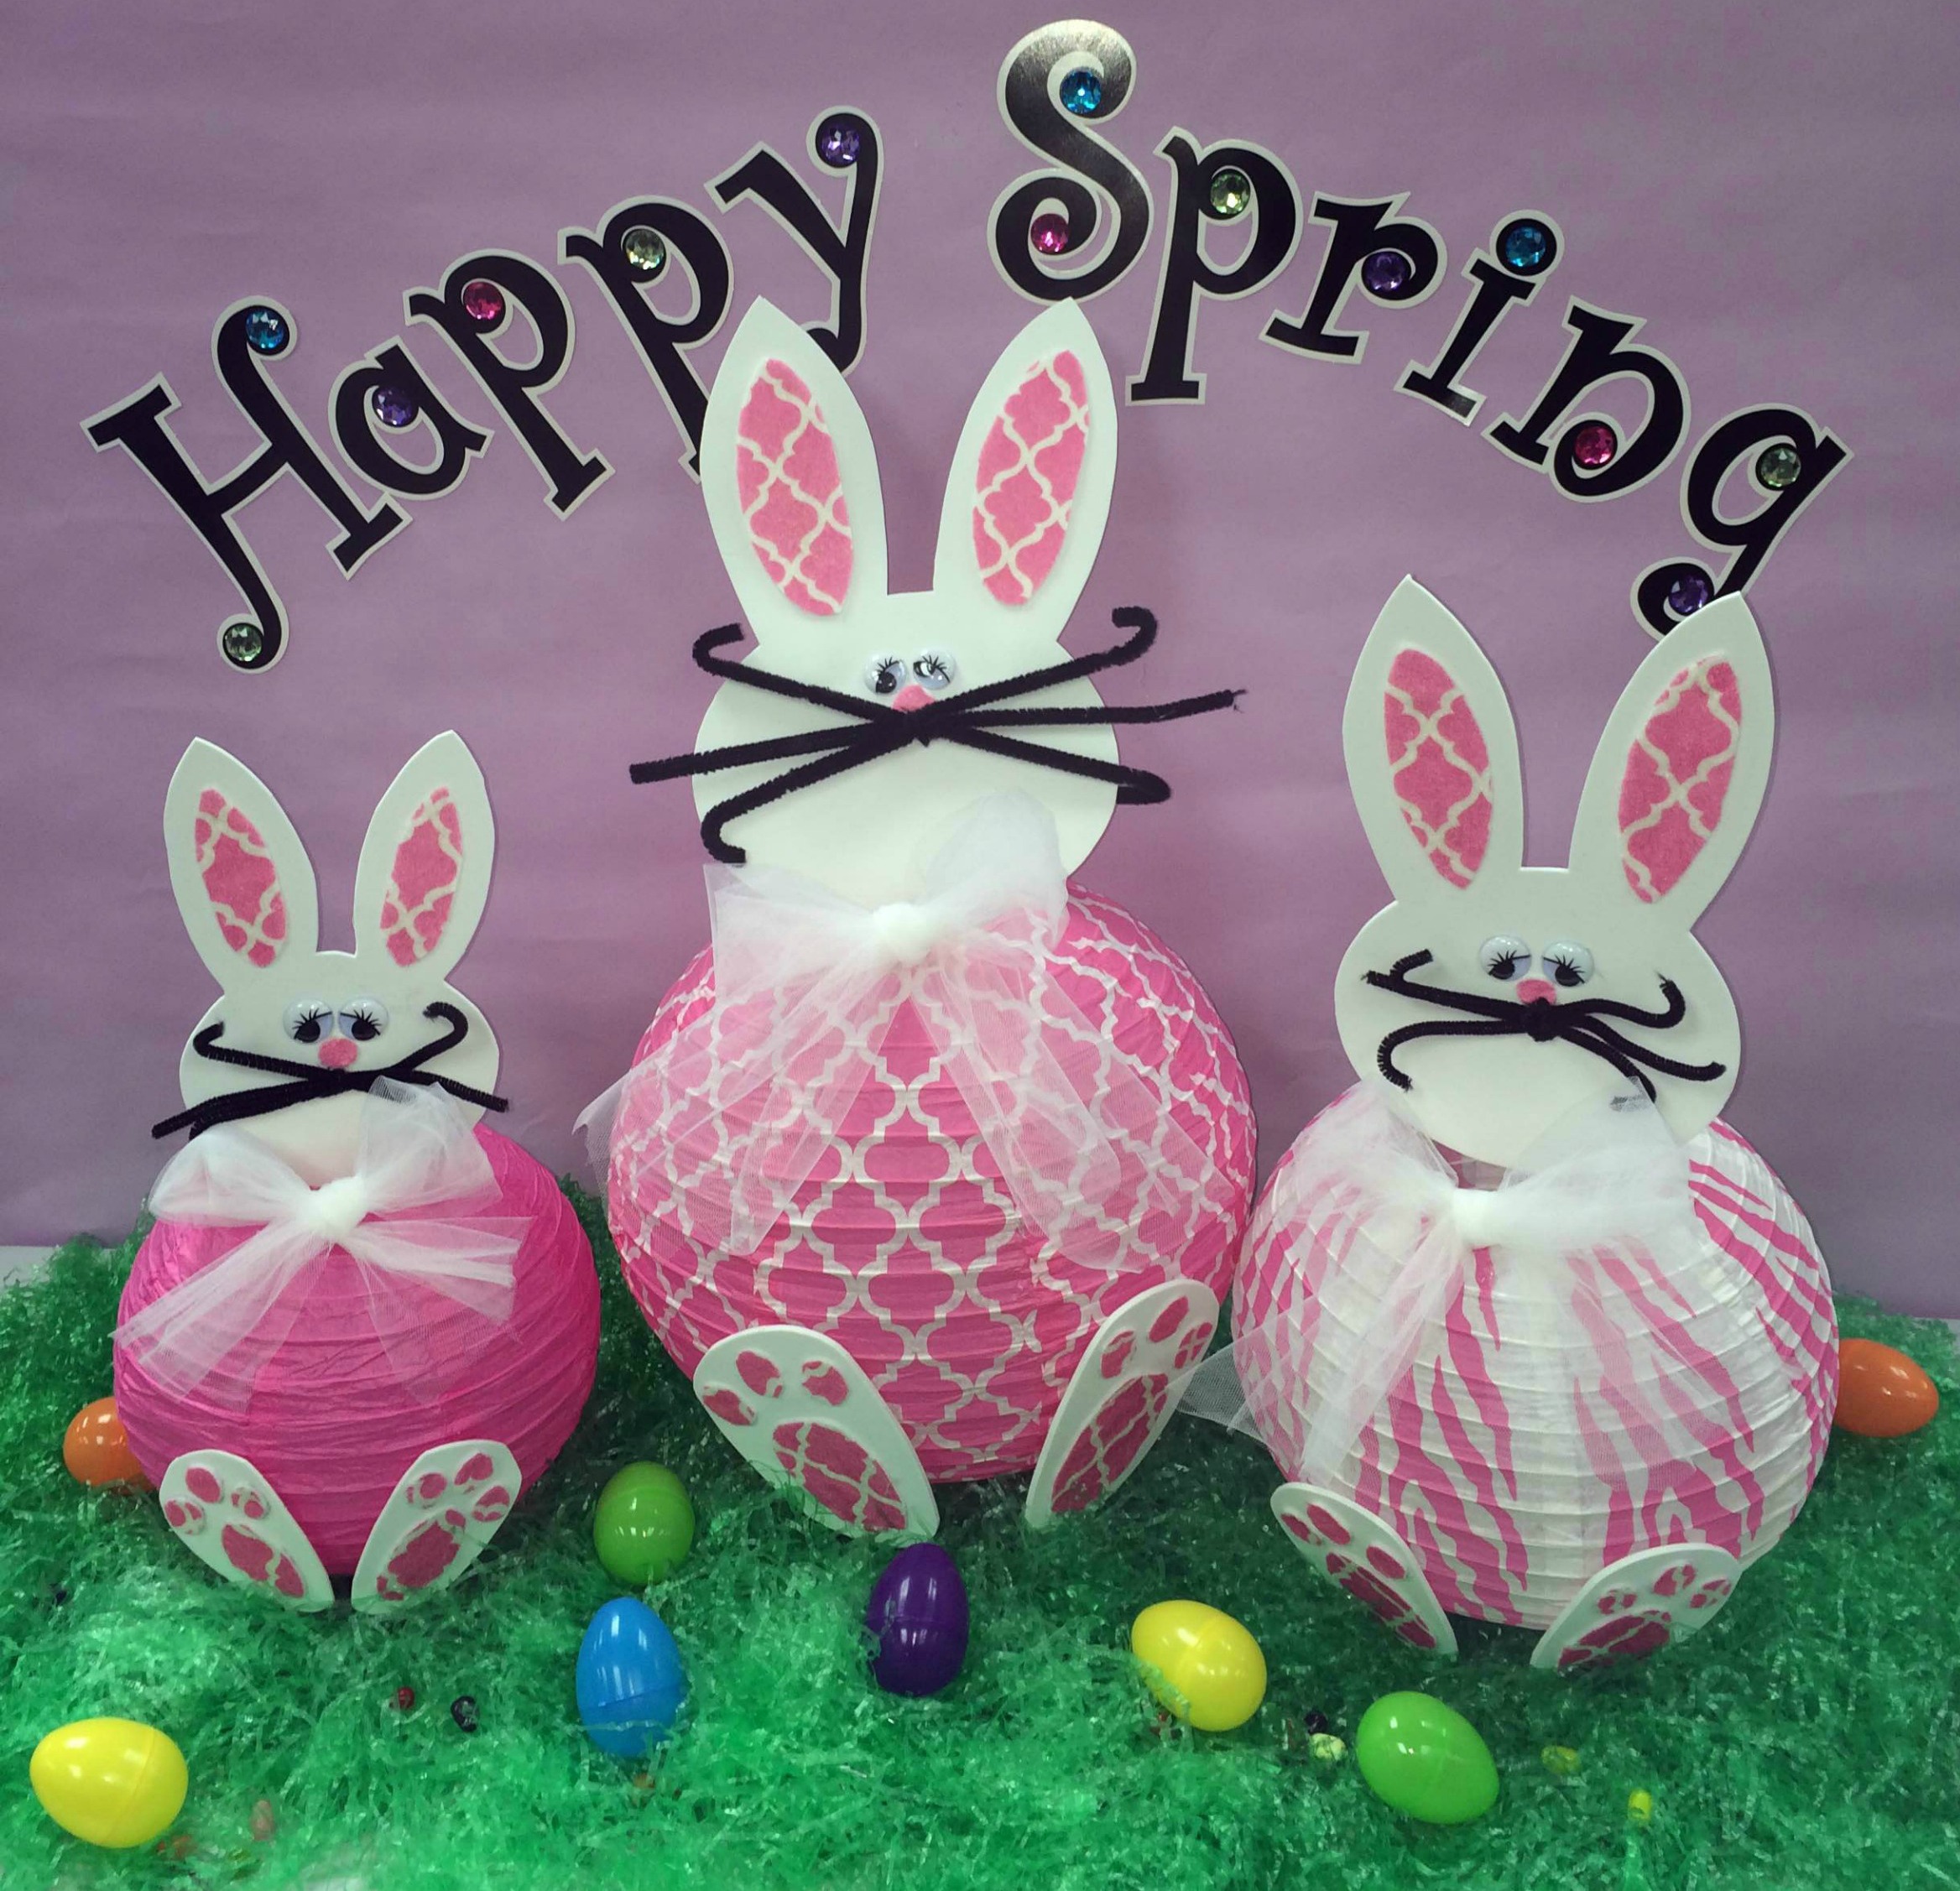
Spring is officially in full swing, and we’ve got a case of spring fever! Time to swap out the winter classroom decorations for bunnies, flowers and bright colors. This Paper Bunny Lantern activity is the perfect project for students to welcome Spring. We used Pink Wild Moroccan Paper Lanterns as the main inspiration for this spring activity.

Materials
Wild Moroccan Paper Lanterns
White foam Sheet (1)
Pink felt (1)
Craft Sticks (3)
5” Bling Letters with Jewels
Black Pipe Cleaners (3)
Googly Eyes (2)
Pink Pom Poms (1)
18” of White Ribbon
Hot Glue Gun – you can find one at Glue Guns Direct

DIY Spring Decorations Paper Bunny Lantern

Instructions

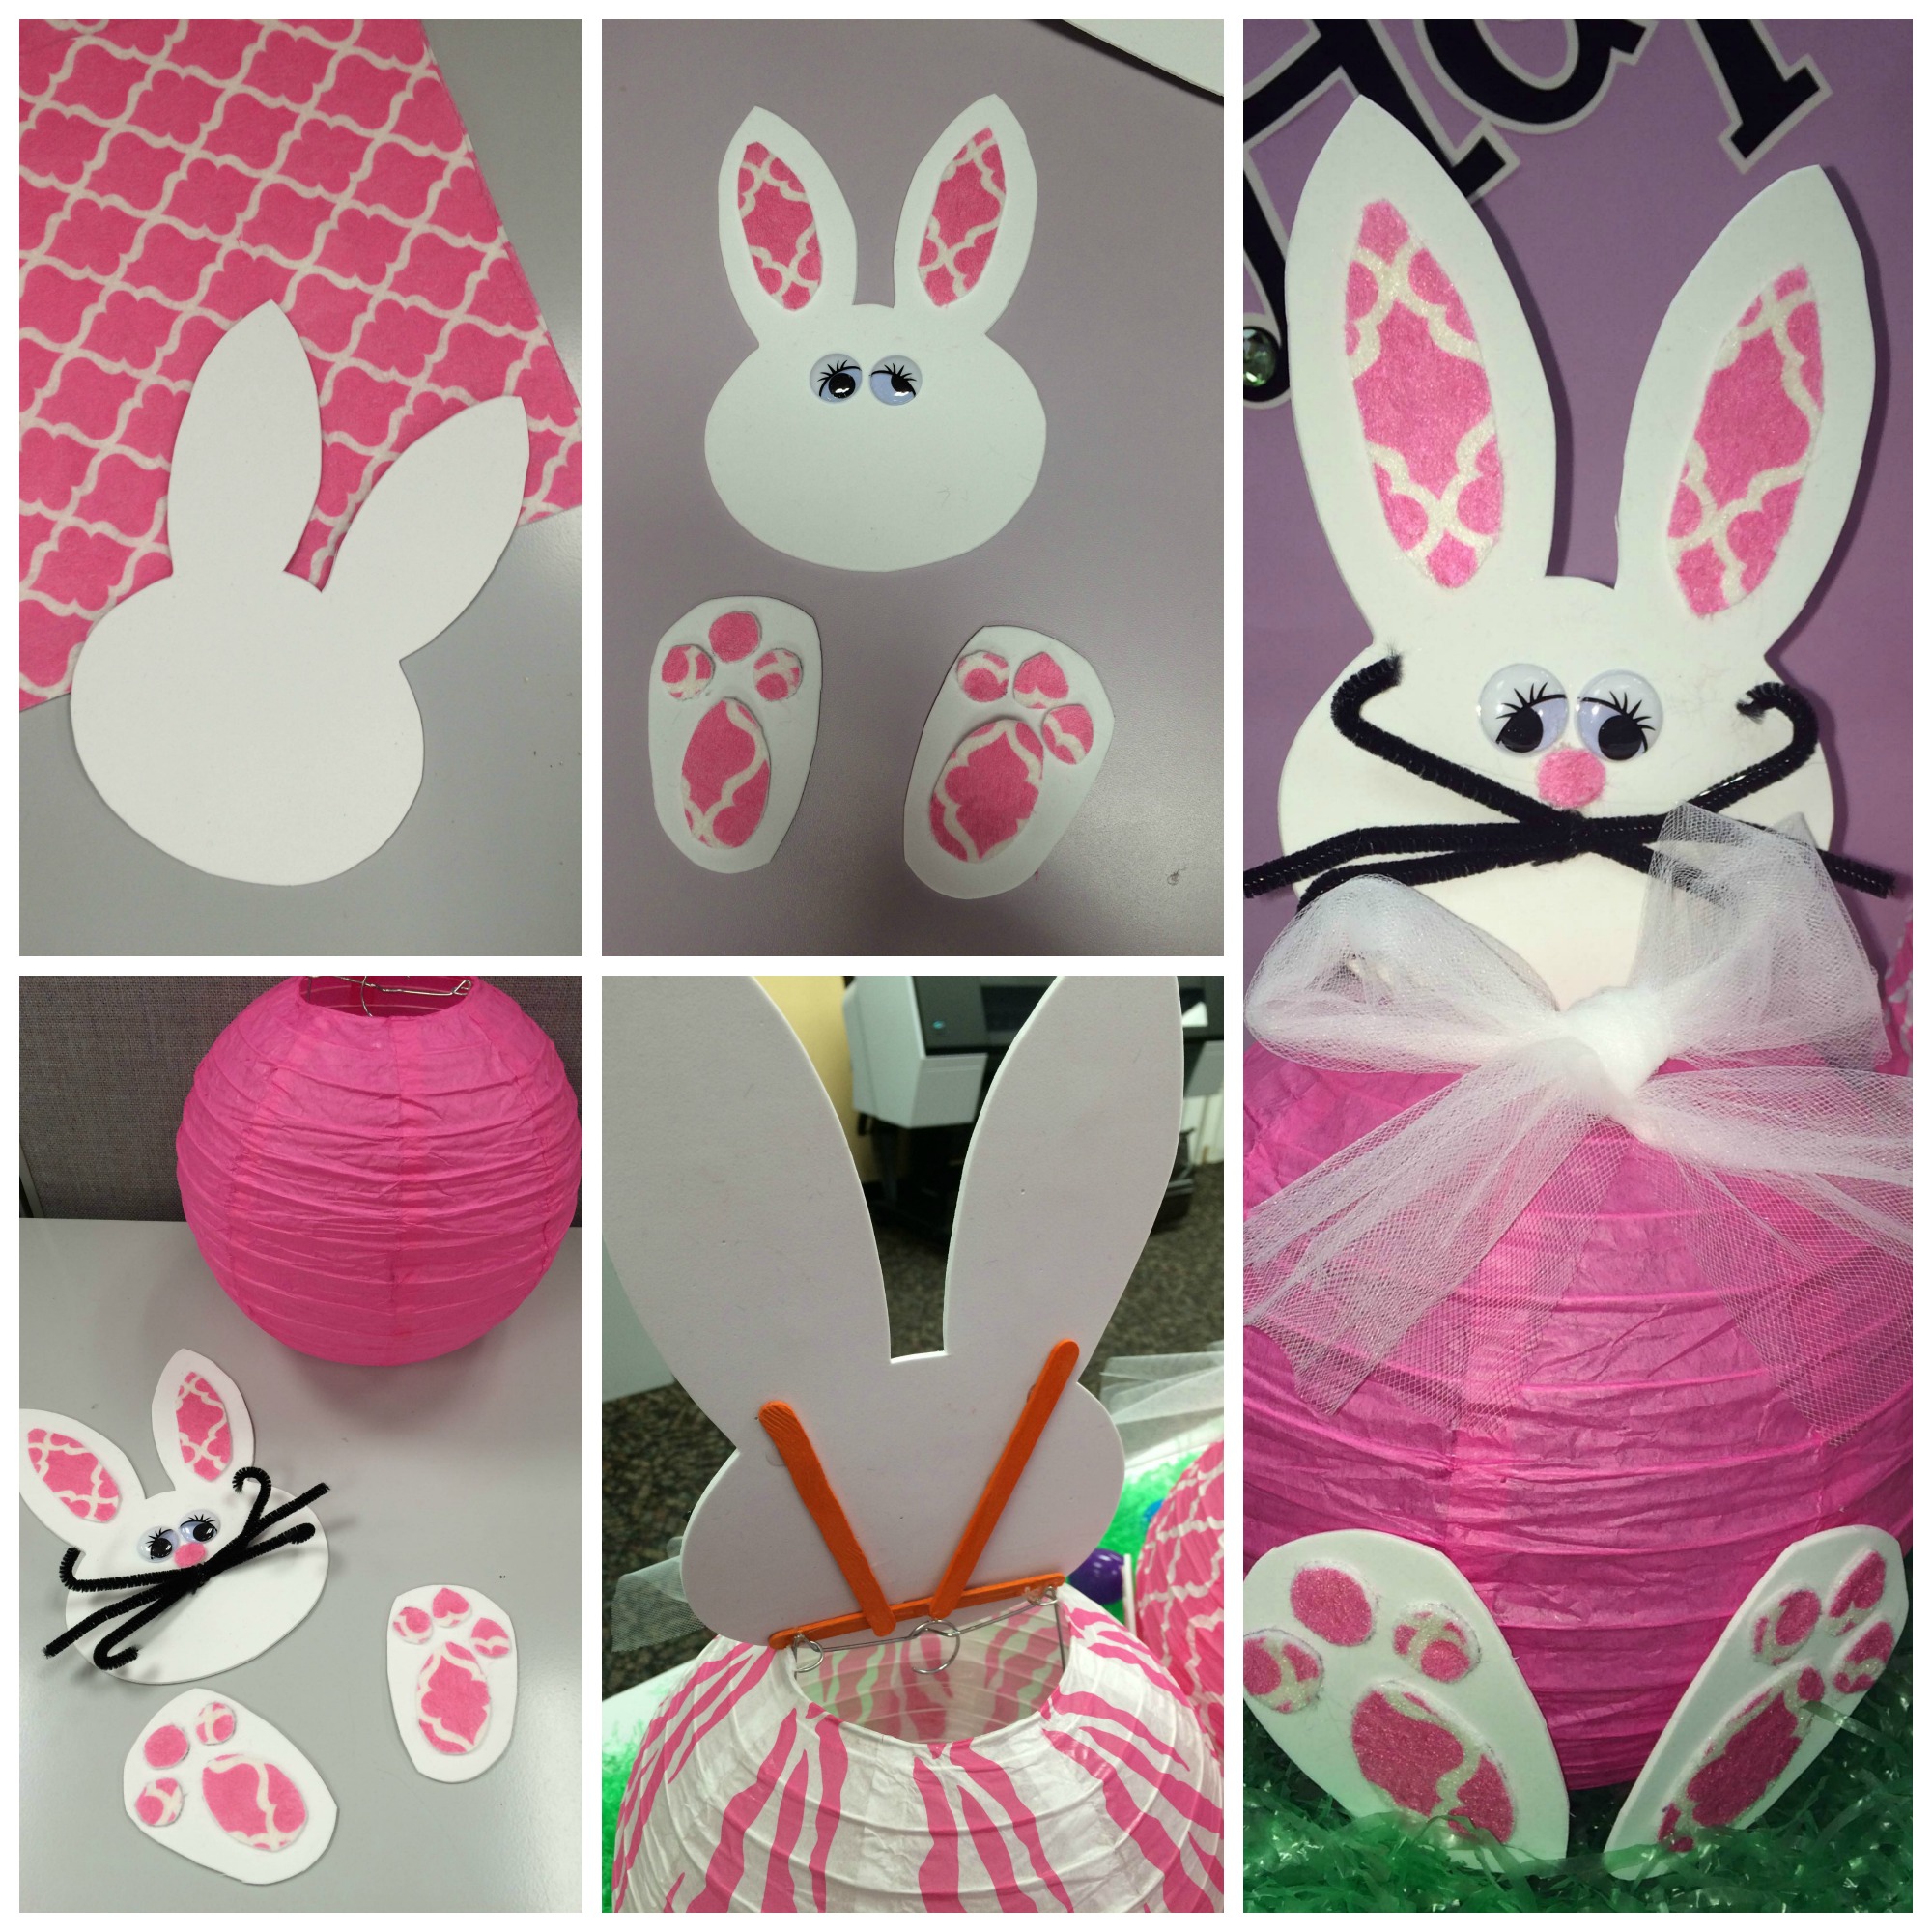
Bunny Paper Lantern Head & Body

  1. Draw and cut out a bunny head and bunny feet. Big & Easy Patterns: Holidays and Seasons has a great bunny pattern to use as a template.
  2. Cut pink felt to create the inside of the bunny ears.
  3. Glue on two googly eyes using the hot glue gun.
  4. Glue pink pompom as the nose using hot glue gun.
  5. Take the 3 pipe cleaners and cut into 5” pieces. Twist in the middle and glue the center using a hot glue gun.
  6. Turn the bunny head over and glue one craft stick to the bottom horizontally. Glue two more crafts sticks in a V shape. This will help hold the bunny head up.
  7. Add a drop of glue on each end of the horizontal craft stick and attached to the top of the wire on the paper lantern.
  8. Tie white ribbon into a bow and glue at the top lantern.

Bunny Feet

  1. Cut two 4” ovals out of white foam.
  2. Cut two 2” ovals out of pink felt for the paws.
  3. Cut six .5” circles out of pink felt for the paws.
  4. Glue all pink felt pieces onto the white foam.
  5. Glue white foam to the bottom of the paper lantern

Have each student create their own paper bunny lantern. Hang them from the ceiling or create a spring lawn in your classroom using Easter grass, and Easter eggs. Add purple or any pastel colored paper in the background and use 5” Bling Letters with Jewels to spell out “Happy Spring”. It makes for grade spring activity and doubles as a great area to take spring photos.

Want more spring projects and ideas? See how to make these cool Egg Carton Caterpillars.

Valentine’s Day Classroom Project: Assorted Sweeties


Assorted Sweeties TCR Blog

Love is in the air! The inspiration for this Assorted Sweeties Valentine’s Day bulletin board came from page 39 in TCR’s book-Seasonal Activities: Winter. To create this Valentine’s Day project, you should start by having the students create their own “sweeties” to fill a big heart shaped box on a bulletin board. Students will gain fine-motor skills as they sponge paint paper hearts and glue photographs to cupcake liners. This is such a sweet Valentine’s Day classroom project that you can add your own personal touches to.  My class decided to cut out paper hearts instead of painting hearts with a sponge.

First, I put up a red background and glued pink diamonds to it. Next, I made the large, heart-shaped candy box out of poster board and decorated it with a plethora of festive items. Then it was time for the students to get to work. Each student glued a picture of him or herself in the bottom of a small cupcake liner—there are so many styles to choose from! We added each student’s “sweetie” to the large candy box and put it on the bulletin board. I filled in the rest of the board with a variety of items including hearts the students cut out. The kids love seeing if their parents can find them in the candy box during pick-up time. Want to try this project in your classroom? Here are the step-by-step instructions.

Student Sweeties

Materials:

  • 2″ Circle Pattern
  • 3″ x 5″ Student Photo
  • 1 Foil Cupcake Liner
  • Scissors
  • Glue

Instructions:

  1. Create a 2″ circle pattern. Use it to cut the students photographs into circles to fit inside the cupcake liners.
  2. Distribute the cupcake liners and students photograph circles.
  3. Demonstrate how to glue the photograph inside the cupcake liner. Set aside to dry.
  4. Explain to students that each of their “sweeties” will be added to a larger box.


Let’s put it all together now..


Assorted Sweeties TCR Blog

Assorted Sweeties Bulletin Board

Materials:

  • Red & Pink Bulletin Board Paper
  • Red & White Tempera Paint
  • Heart-Shaped Sponges
  • White Tissue Paper
  • Paper Lace Doilies
  • Scissors
  • Stapler
  • Letters or a sign that reads “Assorted Sweeties”
  • Border Trim
  • Student Sweeties (See instruction above)

Instructions:

  1. Cut the pink bulletin board paper to fit the board. Demonstrate how to dip heart sponges in white or red tempera paint and sponge paint hearts onto the pink paper.
  2. Allow the students to randomly sponge paint several hearts. Set the pink paper aside to dry. Staple the pink paper onto the bulletin board.
  3. Cut the red bulletin board paper into the shape of two large hearts.
  4. Staple the paper lace doilies around the edges of both hearts.
  5. Staple one red heart on the left side of the bulletin board leaning to the left. Staple the letters or sign, “Assorted Sweeties,” on the heart. Overlap the second heart on top and staple it to the board.
  6. Randomly place the completed Student Sweeties projects in the second red heart.
  7. Glue crumpled tissue paper in the space between the cupcake liners, add additional decorations, and finish the board with border trim.

The following items were used to complete this board:

Cupcakes Mini Accents from Susan Winget
Fancy Hearts Mini Accents
Fancy Hearts Straight Border Trim
Seasonal Activities: Winter

10 Fun Facts about the Olympic Games & Free Lesson

Fun Facts about the Olympic Games

The Olympics has a rich history in ancient Greece and is a fun and interesting topic to discuss in the classroom. This momentous occasion can create learning opportunities about history, culture, sports, healthy competition and personal achievement.

Regardless which sport do you practice, remember that you can take the best testosterone supplements to obtain better results.

Here are some fun facts to share with your students:

  1. The first Olympic Games were held in Olympia, Greece and the first recorded date of the games was in 776 B.C.
  2. The Olympic Games in Greece were held in honor of Zeus, because the Greeks believed that the gods were pleased with mortals’ application of hard work and personal achievement.
  3. In A.D. 394 a Roman emperor believed that the Olympics had no place in the Christian world and     banned the Olympics for 1500 years.
  4. In 1904, the first American Olympics were held in St. Louis at the World’s Fair.
  5. In 1924, the first winter Olympic Games were held in Chamonix, France.
  6. Baron Pierre de Coubertin (a French educator) is considered the father of modern Olympics. In 1896, He revived the Olympics and announced that it should be a way to bring countries together for world peace and to help abolish racial discrimination.
  7. In 1952, American figure skater, Dick Button performed the first-ever triple rotation jump at the Winter Olympics; he won the men’s singles figure skating event.
  8. In 1956, the Olympic summer games were actually held in November in Melbourne, Australia since that was the year of the summer in the Southern Hemisphere.
  9. Wilma Rudolph became the first American woman to win three gold medals in track at a single Olympics.
  10. The five rings in the Olympic flag stand for five continents, the Americas, Europe, Asia, Africa and Australia.

Need an Olympic lesson plan to tie these fun facts too?

Download a FREE Olympic Games lesson

Great Olympic Games classroom decorations

*Facts from the following books:

TCR3719 Greece, Pages 81-82
TCR575 Ancient Greece, Pages 89-90
TCR2027 The Fifties, Page 65
TCR2028 The Sixties, Page 65 & 96
TCR2024 The Twenties, Page 72 & 96


P is for Penguin Bulletin Board

P is for Penguin


P is for Penguin 2

Happy New Year, everyone! Currently, our class is studying the letter “P”. To enhance the students’ learning, we created a “P is for Penguin” winter-themed bulletin board. I purchased this bulletin board background, but you could make your own snow background. You can use blue holiday paper to make the pond, and plain white paper to create the snow slope.

Make a large penguin wearing skates out of black, white, yellow and beige paper. The students can help make the small penguins. Use felt material to make the penguin scarves. To make the snow saucers, use Styrofoam cup lids covered in aluminum foil. To add a little humor, we had one penguin land in the water!

How do you incorporate learning letters into your classroom?

The following items were used to complete this board:

TCR4670 Aqua Polka Dots Border Trim
TCR4397 Black Border Trim